Overview of JupyterHub
English | 中文
JupyterHub is a multi-user version of Jupyter Notebook, which allows many users to work on a server for data analysis, scientific computation, and more. Here’s a comprehensive guide about JupyterHub.
1. Common Features of JupyterHub
JupyterHub allows users to access Jupyter Notebook environments from different devices via web browsers. It has the following common features:
- Multi-User Access: Supports simultaneous use of server resources by multiple users.
- Remote Access: Users can remotely access Notebooks on the JupyterHub server.
- Customized Environments: Each user can have an isolated and customized computing environment.
- Resource Allocation: Administrators can control the allocation of resources such as CPU and memory.
- Security: Ensures security through various authentication methods.
2. Comparison of JupyterHub and Jupyter Notebook
JupyterHub and Jupyter Notebook are both used for creating and sharing documents with live code. Their main differences are:
- Jupyter Notebook is designed for single users, ideal for personal computers.
- JupyterHub allows multiple users to share resources through a server, suitable for teams and classroom environments.
- JupyterHub’s advantages include built-in user management, resource allocation, and security features.
3. Setting Up the JupyterHub Environment
Setting up the environment mainly involves installing, configuring, and starting JupyterHub. Here’s a sequence of commands for setting up the environment on an Ubuntu system:
sudo apt update
sudo apt install -y python3-pip python3-dev npm nodejs
python3 -m pip install jupyterhub
npm install -g configurable-http-proxy
Next, create a configuration file and edit it:
jupyterhub --generate-config
vim jupyterhub_config.py
In the configuration file, you can set options such as the authentication method, user data storage location, and path of log files.
To start JupyterHub, just run:
jupyterhub
This will start the JupyterHub service, which listens on port 8000 by default.

4. Key Components of JupyterHub and Their Workflow
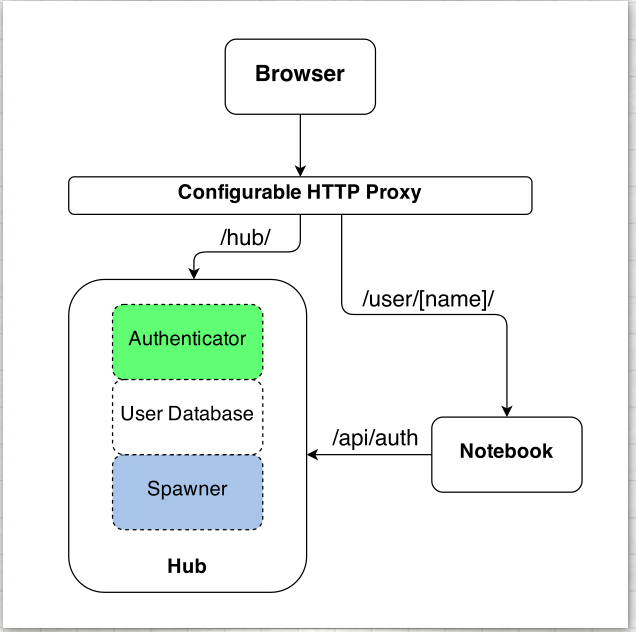
The workflow of JupyterHub involves the coordinated work of several key components:
- Hub: The heart of JupyterHub, responsible for user authentication, as well as starting and monitoring single-user Jupyter Notebook servers.
- Authenticator: Determines how users log in. For instance, the PAM Authenticator uses Unix user accounts and passwords, while OAuthenticator supports using OAuth to authenticate with external services.
- Spawner: Responsible for starting users’ Notebook servers. In a Cloud Kubernetes environment, KubeSpawner can dynamically create and manage users’ Notebook servers on Kubernetes clusters, providing flexible resource management and scalability.
- Configurable HTTP Proxy: The entry point for user requests, responsible for routing requests to the correct user Notebook server. It decides where to send the requests based on the user’s login status and the URL of the request.
- User Notebook Servers: Each logged-in user has an independent instance of a Notebook server, where users do all their work, including writing code and running analyses.
The workflow is as follows:
- Users access JupyterHub through a browser.
- The Hub receives the request and authenticates the user through the Authenticator.
- Once the user is authenticated successfully, the Spawner starts an independent Notebook server instance for that user. In a Cloud Kubernetes environment, this typically involves starting a container or Pod in a Kubernetes cluster.
- The user’s request is forwarded to their Notebook server through the Configurable HTTP Proxy.
- Users operate on their own Notebook server, such as creating, editing, and running notebooks.

The entire process provides a secure, isolated, and resource-controlled working environment for each user, while allowing administrators to efficiently manage and scale server resources.
5. JupyterHub Authentication Mechanisms
JupyterHub supports various authentication mechanisms, each suitable for different scenarios:
PAM Authentication
- Functionality: Uses Pluggable Authentication Modules (PAM) for user authentication.
- Usage Scenario: Suitable for small deployments where all users have accounts on the JupyterHub server’s system.
- Configuration: Generally requires no additional configuration as this is the default method.
OAuth / OAuth2 Authentication
- Functionality: Allows users to authenticate using third-party services like GitHub or Google.
- Usage Scenario: Suitable for organizations that want users to log in using their social accounts.
- Configuration:
python3 -m pip install oauthenticatorIn the
jupyterhub_config.pyfile, set the appropriate OAuth callback URL, client ID, and client secret.
LDAP Authentication
- Functionality: Uses Lightweight Directory Access Protocol (LDAP) for user authentication, typically integrated with an organization’s internal user directory services.
- Usage Scenario: Suitable for enterprises or educational institutions with an existing LDAP server and user database.
- Configuration:
python3 -m pip install ldapauthenticatorConfigure details of the LDAP server in the
jupyterhub_config.pyfile, including address, user DN template, etc.
SAML Authentication
- Functionality: Uses Security Assertion Markup Language (SAML) for user authentication, suitable for enterprise single sign-on.
- Usage Scenario: Large organizations needing integration with enterprise-level identity providers.
- Configuration: Typically requires additional libraries like
python3-samland a more complex setup, including setting the entity ID, assertion consumer service URL, etc.
6. JupyterHub API
JupyterHub’s API provides a programmatic way to manage and interact with JupyterHub.
Main Functions
- User Management: Create, update, and delete users.
- Session Management: Start and stop user’s Jupyter servers.
- Service Management: Add or remove JupyterHub services.
Steps to Use the API
- Obtain an API token, usually specified in the JupyterHub configuration or generated via the user panel.
- Use the API token to send requests to JupyterHub’s RESTful API endpoints.
Example
Retrieve a list of all current users:
curl -H "Authorization: token <your_api_token>" https://<jupyterhub_url>/hub/api/users
7. JupyterHub’s Test Suite
To install JupyterHub’s test dependencies and run the tests, you can use the following commands:
python3 -m pip install --editable ".[test]"
pytest -vx jupyterhub
These commands will install all the test dependencies and run JupyterHub’s test suite, ensuring that all parts of the codebase are functioning correctly.
8. Configuring Nginx as a Reverse Proxy to JupyterHub
Using Nginx as a reverse proxy can enhance security by encrypting data with SSL certificates and provide advanced features like load balancing.
Configuration Steps
- Install Nginx
sudo apt update sudo apt install nginx - Create Nginx Configuration File
Configuration files are typically located in
/etc/nginx/sites-available/. Create a configuration file namedjupyterhub:sudo touch /etc/nginx/sites-available/jupyterhub - Configure Server Block
Edit the newly created configuration file
/etc/nginx/sites-available/jupyterhub, set the listening port (e.g., 80 or 443), and proxy requests to JupyterHub:sudo vim /etc/nginx/sites-available/jupyterhubAdd the following content in the file:
server { listen 80; server_name your-domain.com; location / { proxy_pass http://localhost:8000; proxy_set_header X-Real-IP $remote_addr; proxy_set_header Host $host; proxy_set_header X-Forwarded-For $proxy_add_x_forwarded_for; proxy_set_header X-Forwarded-Proto $scheme; } } - Enable Site and Restart Nginx
Create a symlink to the configuration file in
/etc/nginx/sites-enabled/and restart the Nginx service:sudo ln -s /etc/nginx/sites-available/jupyterhub /etc/nginx/sites-enabled/ sudo systemctl restart nginx - Configure SSL (If Using HTTPS)
If HTTPS is needed, you can use free certificates provided by Let’s Encrypt:
sudo add-apt-repository ppa:certbot/certbot
sudo apt install python-certbot-nginx
sudo certbot --nginx -d your-domain.com
This will automatically update the Nginx configuration to use SSL and periodically auto-renew the certificate.
9. Practical Case: Multi-User JupyterHub Deployment and GitHub User Authentication
Deploying JupyterHub and using GitHub authentication involves the following steps:
-
Register an OAuth Application on GitHub Register a new application in GitHub settings to get the
Client IDandClient Secret. - Install
oauthenticatorpython3 -m pip install oauthenticator - Configure JupyterHub to Use GitHub Authentication
Edit the
jupyterhub_config.pyfile and add the GitHub authenticator configuration.from oauthenticator.github import GitHubOAuthenticator c.JupyterHub.authenticator_class = GitHubOAuthenticator c.GitHubOAuthenticator.oauth_callback_url = 'https://your-domain.com/hub/oauth_callback' c.GitHubOAuthenticator.client_id = 'your-client-id' c.GitHubOAuthenticator.client_secret = 'your-client-secret' -
Configure Nginx as a Reverse Proxy Follow the previous steps to configure Nginx to proxy to JupyterHub and manage SSL.
- Start JupyterHub
jupyterhub
Users can now log in to JupyterHub using their GitHub accounts.
If you found this post useful, feel free to bookmark, share, or follow my blog at astromen.github.io!